Building a Web-Based Markdown Editor with WASIX and WebAssembly
Welcome to this hands-on tutorial where we will build a web-based Markdown
editor using WebAssembly and Wasmer's JavaScript SDK (@wasmer/sdk).
Markdown, a lightweight markup language, is popular for its simplicity and effectiveness in creating formatted text. In this tutorial, we will create an editor that allows users to write Markdown and see the rendered HTML in real-time.
Create the Project
First, let's set up our project environment. Create a new directory for your
project and initialize it using npm.
npm init -yAdd Dependencies
Once initialized, install @wasmer/sdk by running:
npm install --save @wasmer/sdkThe @wasmer/sdk package allows us to run WebAssembly modules in the browser,
crucial running our Markdown renderer.
Install Vite
Next, we'll use vite for bundling our application. It's a fast, modern
bundler and minifier.
npm install vite --save-devPackage Scripts
Let's also set up a couple of scripts to assist development.
"scripts": {
    "dev": "vite",
    "build": "vite build",
}
These scripts provide quick commands to build your application (npm run build)
and start a development server with live reloading (npm run dev).
Create the UI
While this isn't a UI tutorial, we still want our app to be presentable. We use CSS Grid for our layout because it provides a flexible and easy way to create complex layouts with minimal code.
Paste the following into index.html:
<!doctype html>
<html lang="en">

<head>
    <meta charset="UTF-8">
    <meta name="viewport" content="width=device-width, initial-scale=1.0">
    <title>Wasmer Markdown Editor</title>
    <script type="module" defer src="./index.ts"></script>
    <link rel="stylesheet" href="./style.css">
</head>

<body>
    <div class="editor-container">
        <textarea id="markdown-input" placeholder="Type your Markdown here..."></textarea>
        <iframe id="html-output"></iframe>
    </div>
</body>

</html>
Here's some CSS for style.css:
body {
    font-family: Arial, sans-serif;
    margin: 0;
    padding: 0;
    display: flex;
    justify-content: center;
    align-items: center;
    height: 100vh;
    background-color: #f4f4f4;
}

.editor-container {
    display: grid;
    grid-template-columns: repeat(2, 1fr);
    gap: 20px;
    width: 80%;
    max-width: 1200px;
    margin: auto;
    box-shadow: 0 4px 8px rgba(0, 0, 0, 0.1);
    padding: 20px;
    background: white;
    border-radius: 8px;
}

#markdown-input, #html-output {
    border: 1px solid #ddd;
    padding: 10px;
    height: 400px;
    overflow: auto;
}

#markdown-input {
    resize: none;
}

#html-output {
    background-color: #fff;
    width: 100%;
    border: none;
}
Creating a Markdown Renderer in Rust
To render the Markdown to HTML, we'll use a powerful crate from the Rust
ecosystem called pulldown-cmark (opens in a new tab).
First, create a new Rust project:
$ cargo new --bin markdown-renderer
$ cd markdown-renderer
$ cargo add pulldown-cmark
And add the following code to src/main.rs:
use pulldown_cmark::{Options, Parser};
use std::io::Read;

fn main() -> std::io::Result<()> {
    let mut markdown_input = String::new();
    std::io::stdin().read_to_string(&mut markdown_input)?;
    let parser = Parser::new_ext(&markdown_input, Options::all());

    pulldown_cmark::html::write_html(std::io::stdout(), parser)?;
    Ok(())
}
This program will read its STDIN into markdown_input, interpreting it as a
UTF-8 string. The markdown_input is then parsed by the parser and rendered to
STDOUT with pulldown_cmark::html::write_html().
Compile the Markdown Renderer to WebAssembly
The next step is to compile this Rust program to WebAssembly. This will give us an executable that can be run anywhere Wasmer runs, although for our use case we are mostly concerned about running it in the browser.
cargo build --release --target=wasm32-wasiThis should create a markdown-renderer.wasm file under target/:
$ file target/wasm32-wasi/release/*.wasm
target/wasm32-wasi/release/markdown-renderer.wasm: WebAssembly (wasm) binary module version 0x1 (MVP)
If you haven't already, you may need to install Rust (opens in a new tab) and use rustup to
add the wasm32-wasi target:
rustup target add wasm32-wasiTypeScript Setup & Initialization
Now we've got a *.wasm binary, let's start implementing the app's logic.
The first thing we need to do is initialize @wasmer/sdk and load our
markdown-renderer.wasm module.
import { init, runWasix } from "@wasmer/sdk";
import markdownRendererUrl from "./markdown-renderer/target/wasm32-wasi/release/markdown-renderer.wasm?url";

async function initialize() {
    await init();
    return WebAssembly.compileStreaming(fetch(markdownRendererUrl));
}
This uses vite's explicit URL imports (opens in a new tab) functionality to
get a URL that will load our
./markdown-renderer/target/wasm32-wasi/release/markdown-renderer.wasm file.
If you aren't using vite, you will need to explicitly copy
markdown-renderer.wasm to some sort of public/ directory and make sure it
is distributed with the rest of your app's files.
Debounce Function
Create a utility function that we can use to debounce render calls. This will
help avoid flashes and jank as the <iframe> is constantly updated.
function debounce(func: (...args: any[]) => void, delay: number): (...args: any[]) => void {
    let debounceTimer: ReturnType<typeof setTimeout>;

    return function(...args: any[]) {
        clearTimeout(debounceTimer);
        debounceTimer = setTimeout(() => func(...args), delay);
    };
}
Markdown Rendering Logic
async function renderMarkdown(module: WebAssembly.Module, markdown: string) {
    const instance = await runWasix(module, {});
    const stdin = instance.stdin.getWriter();
    const encoder = new TextEncoder();

    await stdin.write(encoder.encode(markdown));
    await stdin.close();

    const result = await instance.wait();
    return result.ok ? result.stdoutUtf8 : null;
}
The Main Function
async function main() {
    const module = await initialize();
    const output = document.getElementById("html-output") as HTMLIFrameElement;
    const markdownInput = document.getElementById("markdown-input") as HTMLTextAreaElement;

    const debouncedRender = debounce(async () => {
        const renderedHtml = await renderMarkdown(module, markdownInput.value);
        if (renderedHtml) {
            output.srcdoc = renderedHtml;
        }
    }, 500); // 500 milliseconds debounce period

    markdownInput.addEventListener("input", debouncedRender);
}

main();
Take it for a Test Drive
Our markdown editor should now be complete. Let's start up the dev server and have a look!
If you run npm run dev right now and start writing text in the input box, you
won't see anything appear on the right side of the window. If you open up the
dev tools, you'll probably see a message along the lines of this:
Library.mjs:11 Uncaught (in promise) Error: Write failed
    at A.wbg.__wbg_new_ab87fd305ed9004b (Library.mjs:11:46497)
    at 012cca42:0x2b7669
    at 012cca42:0x3a9c74
    at 012cca42:0x24c0bb
    at 012cca42:0x312190
    at 012cca42:0x3331c4
    at 012cca42:0x3b0dae
    at cA (Library.mjs:11:25455)
    at C (Library.mjs:11:25290)
This is a pretty unhelpful error message, but we can make troubleshooting a lot
easier by enabling logging just after the await init().
import { init, runWasix, initializeLogger } from "@wasmer/sdk";

async function initialize() {
    await init();
    initializeLogger("debug");
    return WebAssembly.compileStreaming(fetch(markdownRendererUrl));
}
Hitting save and reloading the page now gives us some more useful information.
DEBUG run: wasmer_js::runtime: Initializing the global runtime
DEBUG run: wasmer_js::tasks::scheduler: Spinning up the scheduler thread_id=0
DEBUG run: wasmer_js::tasks::scheduler: Sending message current_thread=0 scheduler_thread=0 msg=SpawnWithModule { module: Module { name: None }, task: _ }
WARN run: wasmer_js::tasks::scheduler:
    An error occurred while handling a message
    error=Failed to execute 'postMessage' on 'Worker':
        SharedArrayBuffer transfer requires self.crossOriginIsolated.
DEBUG wasmer_js::streams: EOF
I've formatted the log output for readability, but it looks like we've run into
SharedArrayBuffer and Cross-Origin Isolation issues!
Configure your Dev Server
The fix is to make sure Vite's dev server sends the correct COOP and COEP
headers through vite.config.js.
import { defineConfig } from "vite";

export default defineConfig({
    server: {
        headers: {
            "Cross-Origin-Opener-Policy": "same-origin",
            "Cross-Origin-Embedder-Policy": "require-corp",
        },
    },
});
Trying it Out
Now that's fixed, let's restart the dev server and have a look!
$ npm run dev
   VITE v5.0.4  ready in 107 ms

  ➜  Local:   http://localhost:5173/
  ➜  Network: use --host to expose
  ➜  press h + enter to show help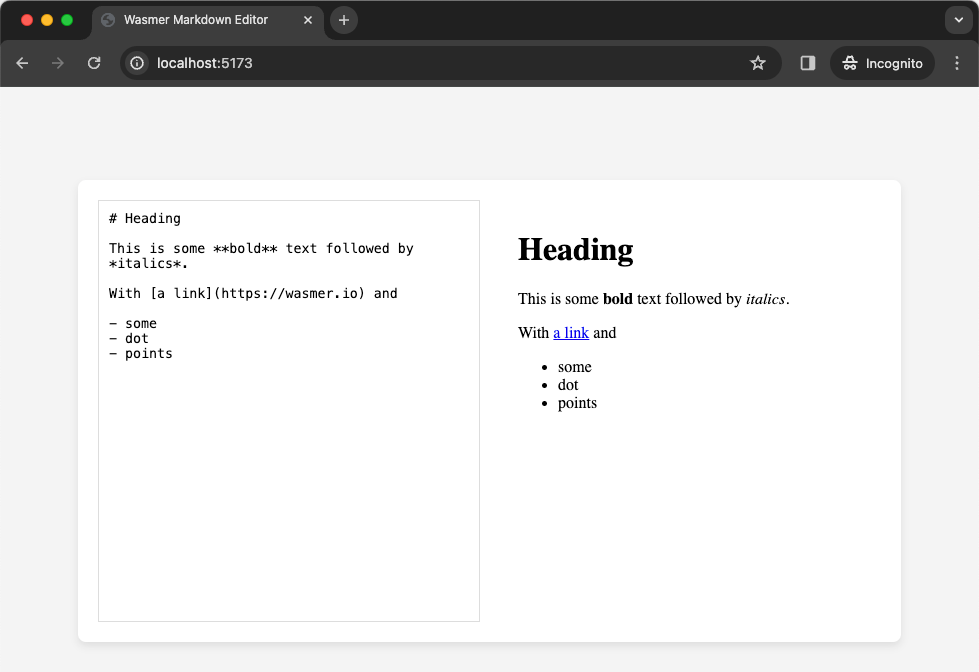
(Optional) Automatically Compile Rust
It's possible to make vite automatically compile the markdown-renderer crate
every time you run npm run build by using the onBuild (opens in a new tab) hook.
import { defineConfig } from "vite";
import { exec } from "node:child_process";

export default defineConfig({
    ...
    plugins: [
        {
            name: "cargo-build",
            buildStart: () => {
                return new Promise((resolve, reject) => {
                    exec(
                        "cargo build --target=wasm32-wasi --manifest-path=markdown-renderer/Cargo.toml --release --quiet",
                        (err, stdout, stderr) => {
                            if (err) {
                                console.log("Stdout:", stdout);
                                console.log("Stderr:", stderr);
                                reject(err);
                            } else {
                                resolve();
                            }
                        }
                    );
                });
            }
        },
    ]
});